What is MongoDB?
MongoDB is an open-source NoSQL database with a massive focus on flexibility and scalability. It is also the most popular structureless database at the time of writing.

Why use MongoDB?
MongoDB allows developers to move quickly and get MVPs done while still being production-ready. That’s because:
- It stores records in a JSON-like format, which Javascript developers find very easy to work with;
- It’s straightforward to learn and start, cheap, and easy to scale.
For the reasons above, MongoDB is a popular choice among Agile teams as it allows data structure evolution without migraine-inducing migrations.
Installing MongoDB
Like most databases, you can install MongoDB locally or use a paid database as a service version like MongoDB Atlas. In this article, we’ll discuss installing the MongoDB community server on your machine. But first, let’s talk about whether that’s even a good idea for you.
Do I even need to install it locally?
Well, technically, no. If you’re happy with all of your data being in the cloud, here are two popular choices:
- MongoDB Atlas is free for 512Mb storage (more than enough to start new projects).
- DigitalOcean begins at $15/month and is a good option if you choose to host your entire application there.
Suppose you choose any of the steps above. In that case, you’re still welcome to follow the installation steps below and install helpful tools such as MongoDB Shell and Compass.
Installing on Windows
- Download MongoDB from the Official Download Center – “Windows” should be pre-selected under “Platform.”
- After the download is complete, open the installer, where you’ll find your usual “next, next, next” sort of install process. There are a couple of things we recommend that you follow:
- Unless you have particular needs, we recommend you choose the “Complete” option when asked which type of installation you’d like to proceed with.
- Check “Install MongoDB as a service unless you want to manually start the MongoDB instance every time you need to use it.
- Optional but very handy: You can install MongoDB Compass at this point by ticking the “Install MongoDB” option during the setup. Compass is a GUI for easier access to your databases.
- Open a new command prompt and type `mongosh.exe` to connect to MongoDB.
- You’re all set!
Installing on macOS
- Open the macOS Terminal and install Xcode command line tools by typing: `xcode-select –install`.
- Install Homebrew by typing:
`/bin/bash -c “$(curl -fsSL https://raw.githubusercontent.com/Homebrew/install/HEAD/install.sh)”`. - Add the MongoDB formula to Homebrew by typing:
`brew tap mongodb/brew` - Now update Homebrew: `brew update`
- And finally, install MongoDB by typing `brew install mongodb-community@6.0`
- Now, to run MongoDB as a service (in the background), type `brew services start mongodb-community@6.0`
- You can now connect to MongoDB by typing `mongosh` in the terminal.
- Optional but very handy: Install MongoDB compass to easily manage your database via a user-friendly GUI. Click here to download it for macOS.
Installing on Linux
Given the significant differences between Linux distributions and their package managers, there’s no one size fits all tutorial for Linux. Here are some helpful guides for the following distros:
- Ubuntu
- Red Hat
- Debian
- SUSE
- Arch Linux (including Manjaro and other distributions):
- MongoDB is available in the AUR. You can run this command to install it: `pamac build mongodb-bin`.
Please note that you can also use Homebrew on Linux to install MongoDB. For that, follow the macOS steps starting with step 2. However, this is much better optimized for macOS, and we recommend you follow the steps native to your system.

How to connect?
For all of the options below, we’ll talk about a “connection string.” This tells your MongoDB client or application where your database is located. If you’re running MongoDB locally, that’s by default:
`mongodb://localhost:27017`
If you’re using MongoDB Atlas, go to the Cluster view. Click the ‘Connect’ button for the cluster you wish to connect to, and you’ll find the connection string there. If you’re using DigitalOcean or another cloud provider, they will let you know your connection string, usually during setup.
MongoDB Shell
The MongoDB Shell, or mongosh for short, is a command line environment to interact with your MongoDB database. Generally, you will use mongosh to test queries locally and to quickly update data.
To connect to your database using MongoDB Shell, open your terminal and type:
- `mongosh` – if your database runs locally
- `mongosh “[CONNECTION STRING]”`, replacing [CONNECTION STRING] with your, well, connection string.
And that’s it! You’re now connected to your MongoDB server unless any errors pop up. You can type `show dbs` as a command to check if any databases are already created — what do you expect to show up?
MongoDB Compass
MongoDB Compass is a GUI that helps you make small changes to your database without knowing any commands. It also allows you to visualize your database quickly. You could download it from their official website if you didn’t already install it.
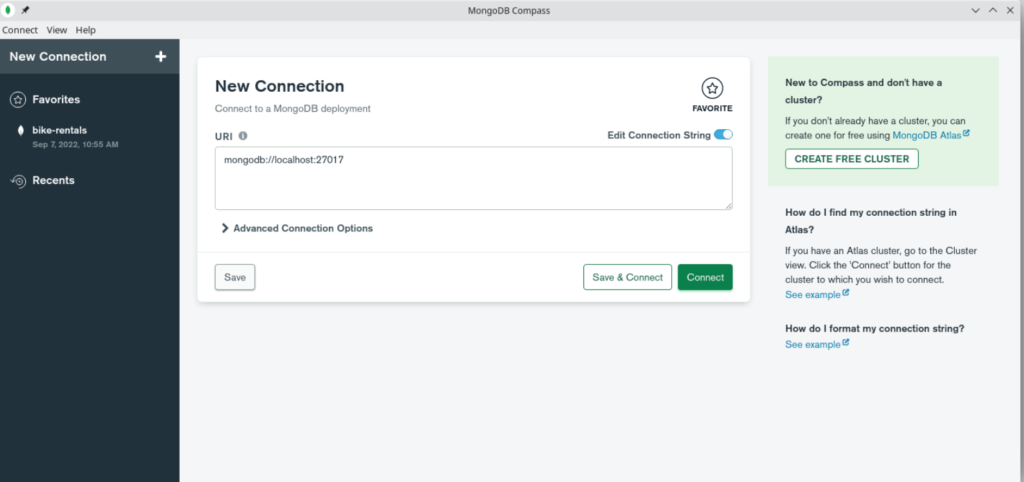
As you can see, the default URI is set to localhost, which is fine if you’re running your MongoDB instance locally. If not, replace that with the one provided by your cloud provider.
You can now click “connect,” and you’ll be connected to the database. If you’d like to save the connection string for later, click on “save & connect,” give it a name you’ll remember, choose a color and save it. The next time you open Compass, you’ll find it in the sidebar under “favorites.”
Custom application
If you’re building an app with Express.js, Mongoose is an excellent option to access your database. Since it’s one of the most popular choices, with almost 2 million weekly downloads at the time of writing, we’ll cover it here.
Using a different stack, you can use other packages such as PyMongo for Python or the Ruby MongoDB Driver.
- Install Mongoose in your project by running `npm install mongoose –save`.
- Import the connect function from mongoose: `import { connect } from ‘mongoose’`
- Now, from any async function, you can run `await connect(‘[CONNECTION STRING]’)`, replacing [CONNECTION STRING] with your own.
- Done! You’re technically connected, but nothing has happened yet. We’ll talk a bit more about using MongoDB later in the article.
MongoDB examples
MongoDB: creating a new collection
One of the first things you’ll do after creating and connecting to your new database is create a new collection. In a real-life scenario, these collections are things like “users”, “posts”, “comments”, etc. To keep things simple for this tutorial, let’s create a database of pets.
In the shell, you can just create the collection by typing:
“`
db.createCollection(“pet”)
“`
If you’re using Mongoose, you need to create a schema for your collection, which helps keep things neat and avoid errors. You can continually update and add to your schema, so there is no need to overthink here:
“`
const petSchema = new mongoose.Schema({
name: String,
type: String,
breed: String,
age: Number,
});
const Pet = mongoose.model(‘Pet’, petSchema);
“`
Adding objects to your collection
Now that we have a Pets collection, let’s add our first pet to it via the mongo shell:
“`
db.pet.insertOne({
name: “Mewton”,
type: “cat”,
breed: “European”,
age: 1
})
“`
And voila! We’ve just added our first pet to the database. Let’s add another two, this time via Mongoose:
“`
const ashley = new Pet({
name: “Ashley”,
type: “cat”,
breed: “Scottish Fold”,
age: 1
});
const bobo = new Pet({
name: “Bobo”,
type: “cat”,
breed: “Maine Coon”,
age: 0.8
});
await ashley.save();
await bobo.save();
“`
MongoDB collection find example
Now that we have all our pets in the database, let’s see if we can find them. Here’s the query to find all the cats in the database:
Shell:
“`
db.pet.find({type: “cat”})
“`
Mongoose:
“`
const cats = await Pet.find({
type: “cat”
});
“`
MongoDB query operators examples
MongoDB includes a couple of operators that help us filter results. An example would be `$lt`, which stands for “less than.” If we want to, for example, find all cats that are less than 1 year old, here’s how we can do it:
Shell:
“`
db.pet.find({
type: “cat”,
age: { $lt: 1 }
})
“`
Mongoose (almost the same thing!):
“`
const pets = await Pet.find({
type: “cat”,
age: { $lt: 1 }
});
“`
Of course, there are many more, and they’re pretty straightforward. Click here for an official list of operators.
MongoDB find projection example
If you’d only like to retrieve, let’s say, the names and ages of your cats, projection comes in handy. Here’s how to do it:
Shell:
“`
db.pet.find({ type: “cat” }, { name: 1, age: 1 });
“`
Mongoose:
“`
const pets = await Pet.find(
{ type: “cat” }, { name: 1, age: 1 }
);
“`
You’ll notice that the `_id` is always projected by default. If you’d like to get the entries without the id, add `_id: 0` to the projection.
Conclusion
Now you’re all set to begin your journey with MongoDB. We’re sure you’ll love it since it’s an easy-to-use database with a syntax that’s very friendly to javascript developers while also being very performant and scalable. If you liked this article and would love to keep on learning, MongoDB offers some free courses via their MongoDB University. A good course you can take right now is the MongoDB Basics course.